Selenium + Beautiful Soup
A common need is web scraping, the ability to copy content from an online web page. In data analytics, this is often used to extract data from a web page into a format amenable to follow-on analysis in languages like Python, R, SAS, or SQL.
At its inception, web pages were a simple combination of Hypertext Markup Language (HTML) to style the content of a page, the Hypertext Transfer Protocol (HTTP) to transfer HTML documents over the Internet, and web browsers like Mosaic to convert HTML into a rendered presentation. HTML supported document structuring: paragraphs, tables, lists, and so on; and text styling: boldface, italics, and other types of visual modification of text.
Modern web pages are very different from their ancestors. Now, pages commonly contain complex styling and programming that a web browser must interpret and execute prior to displaying a page. Two common examples are Cascading Style Sheets (CSS) and Javascript programs to control both the appearance and the functionality of a web page.
In order to web scrape in this new reality, two steps are needed. First, the web page must be read and interpreted into its final format. Selenium is used to do this, since it has the ability to mimic a web browser by reading raw HTML, then performing the execution necessary to convert the HTML into its final format. Although Selenium is designed to perform web page testing, it can also deliver the HTML for a fully rendered page. Once that HTML is available, it needs to be read and parsed. In Python, we use Beautiful Soup to do this.
Even with Selenium and Beautiful Soup, web scraping is non-trivial. For example, web pages often have interactive controls that need to be invoked in a specific order to arrive at the page of interest. Selenium is fully capable of doing this, but the raw HTML must be examined to determine how to uniquely identify the web page controls to manipulate. This information is needed by Selenium to locate and modify widgets on the web page. Once the target page is scraped, the HTML must again be examined for to determine how to tell Beautiful Soup what we want to scrape. Well written HTML will have easy-to-locate identifiers for all the main elements on a page. Poorly written HTML will not. Both can be parsed, but the effort required for poorly written pages is more complex. Regardless, for both Selenium and Beautiful Soup, understanding how HTML works is a prerequisite for scraping most pages. If you need a quick introduction to HTML, refer back to our discussion of HTML5 on the plotly | Dash lessons.
id & class
Extending our understanding of HTML, the most common way to identify a
particular section of HTML is through its id
or class, two attributes that can be attached to most
HTML markup tags. As an example, consider the following simple HTML
code.
In HTML, the id attribute is used to identify a
specific HTML structure. The class tag is used to assign a
pre-defined class to the structure, usually to style the structure in
some common way throughout the document. Both Selenium and Beautiful
Soup allow us to select HTML structures based on their id
and class attributes, or combinations thereof. This is
the most common way of identifying the target structure we wish to
extract from a web page.
Selenium can be installed as a package in Python from the Anaconda Prompt by typing the following.
You may need to run the prompt in Administrator mode to
allow conda to update your Anaconda installation.
Previously, Selinium also required you to install a
webdriver. However, the most recent
versions of Selenium include webdrivers for most common web browsers as
part of their library. This makes using Selenium much easier.
A webdriver allows you to programmatically drive a web page, exactly as though you were a user. You can ask Selenium to load a page, click elements on the page, fill in text fields, scroll the page, and do any of the other things a real user could do if they were viewing the page in their own web browser. The webdriver itself is a program that runs on your computer and mimics one of the common web browser. Currently, Selenium includes webdrivers for Chrome, Firefox, Edge, IE, and Safari. Unless you have a need for specific browser compatibility, the driver you choose isn't particularly important.
At this point, you have everything you need to load Selenium in Python, invoke a controllable version of one of the common web browsers, then use Selenium to load a page and manipulate its contents to navigate to to the location where you want to scrape data. At that point, the page's HTML can be retrieved and passed to Beautiful Soup for further processing. Given this, the high-level order of processing for web scraping with Selenium and Beautiful Soup is as follows.
As noted above, one of the fundamental requirements for Selenium or Beautiful Soup is properly identifying the HTML structures in a web page you want to manipulate or scrape. The easiest way to do this is to load a web page into your favourite web browser, then use the developer tools every browser provides to examine the underlying HTML source code in detail. The discussion in these notes will use Chrome as an example, since it provides a robust set of examination tools. The same functionality can be performed in Firefox, Safari, or any other browser, however, using whatever commands they make available for this type of exploration.
To begin, run Chrome and load NC State's homepage
at https://www.ncsu.edu. Next, click on the three
vertical dots in the top-right corner of the browser window to reveal
Chrome's menu. Choose More tools → Developer
tools to bring up Chrome's developer tools (you can also use
the keyboard shortcut Ctrl+Shift+I to do the same thing.)
If this is the first time you've used the developer tools, they will
appear in a dock inside the browser window to the left or
right. To force the developer tools into their own, separate window,
click the three vertical dots in the upper-right corner of the tools
dock, and click on the Dock side option that shows two overlapping
windows. This will pull the developer tools into a window separate
from the browser window.
The developer tools are designed for a variety of options, including
examining a web page's source code, debugging Javascript code, and
confirming resources for the page loaded properly over the network. Since
we're interested in examining HTML source code, choose the tab labelled
Elements at the top of the page. This shows the an
overview of the code that makes up NC State's homepage, with exposure
triangles to allow you to show and hide more detailed information
contained in the page. Move your mouse over the different lines in
the source code list. You should see different parts of the main browser
window highlight. This is showing you which parts of the web page correspond
to which parts of the code you are moving over.
RESOURCES Link
Notice that if we click on the magnifying glass icon with the three
vertical dots to its right at the top of the page, a panel slides down
with additional options to selection. If we wanted to do this with
Selenium, we would need to determine how to uniquely identify the
magnifying glass button. The fastest way to do this is to ask Chrome's
developer tools to identify the HTML that controls the icon. To do
this, click on the dashed box with an arrow in it's lower-right corner
in the very upper-right corner of the developer tools window or
hit Ctrl+Shift+C. The page inspector icon should turn
blue. Next, hover over the magnifying glass in NC State's homepage. A
blue overlay will cover the icon, with an information popup shown
underneath it. Click on the icon, and the exact line of HTML in the
source code will be revealed that controls the magnifying glass.
When I hover over the Page Inspector icon in the
DevTools window, the svg element with
id="Layer_1" is exposed and highlighted.
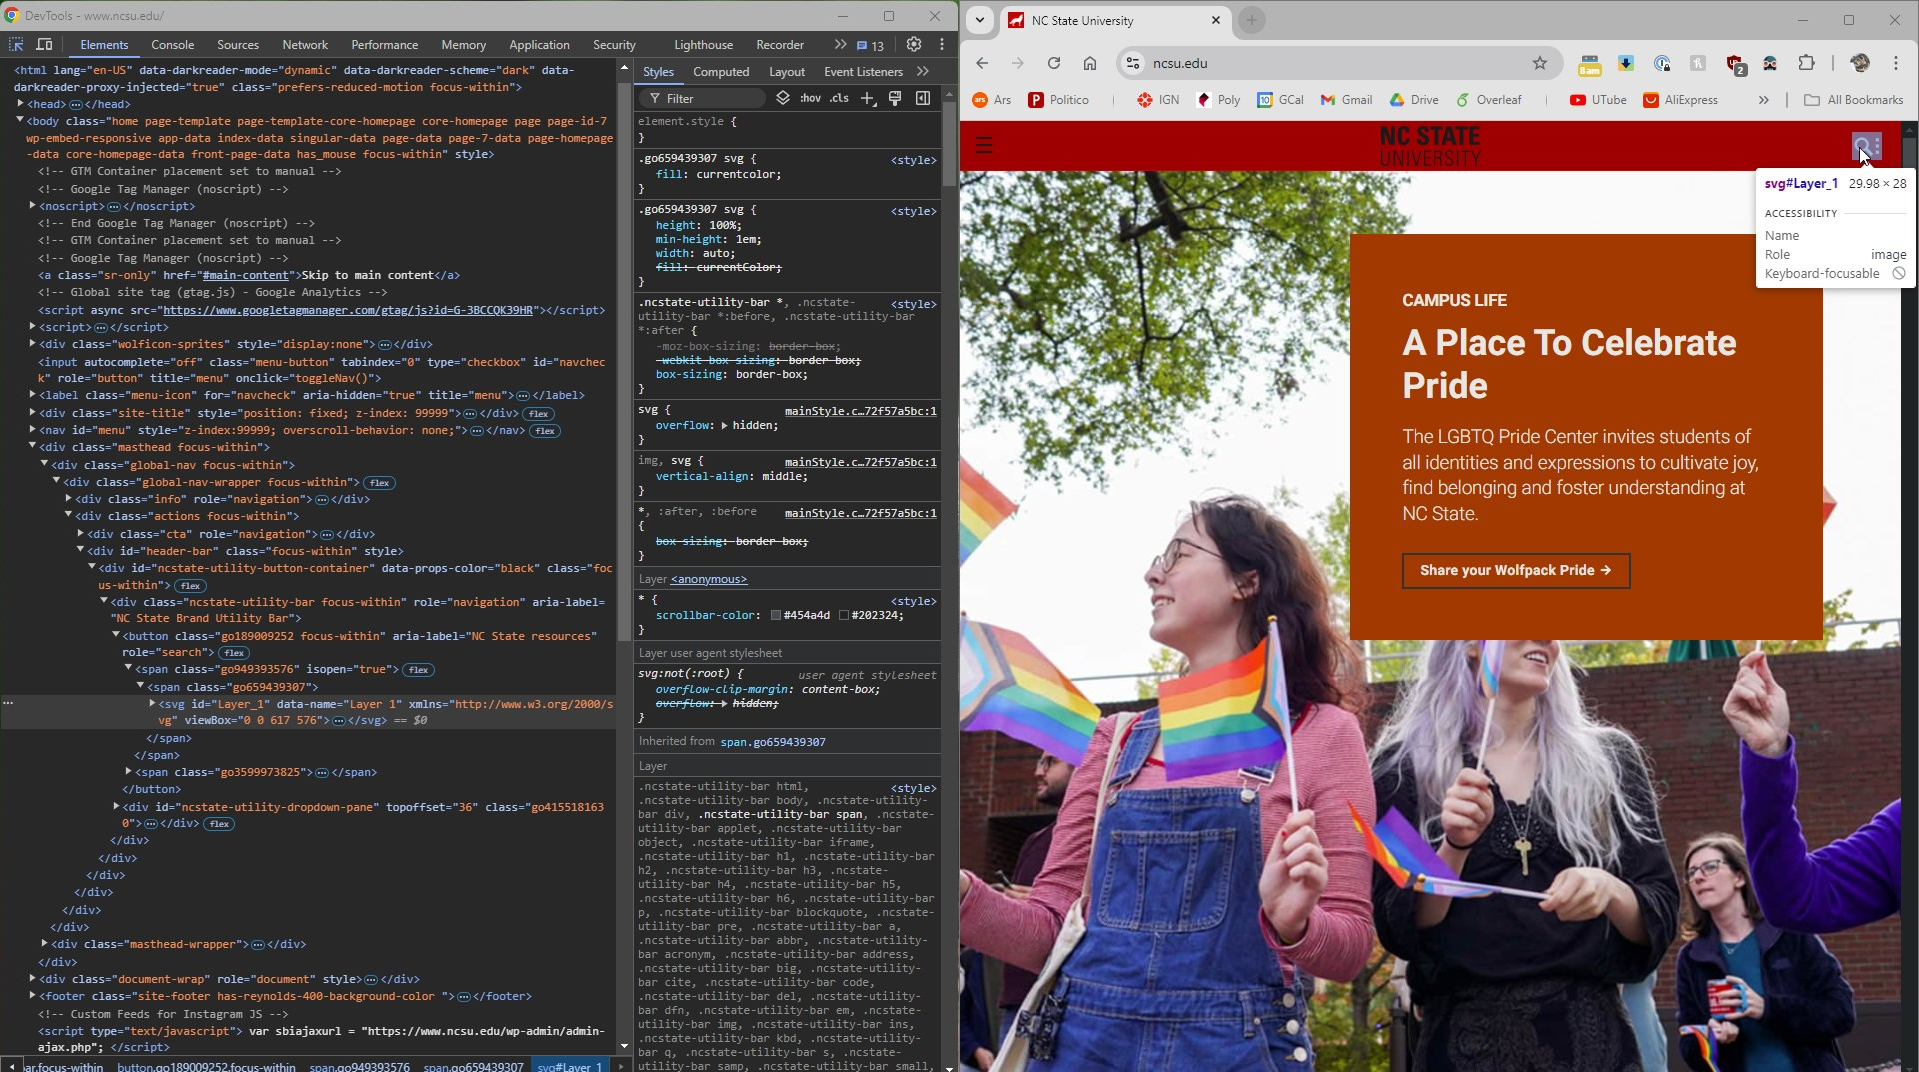
This shows how you can use Chrome's developer tools to walk in and out of the code to find the specific elements you want to manipulate, and what unique identifiers can be used to allow Selenium to manipulate them.
Now that we know how to identify the magnifying glass button, how
would we use Selenium to automatically select it in
a webdriver? The following Python code snippet will
create a webdriver, load the NC State homepage, click
the magnifying glass link, wait for 5 seconds, then terminate.
Moving further into our example, supposed I want to select the
Directory link at the top of the panel. Some exploring
identifies its id
as ncstate-utility-bar-first-link. The following code
duplicates our previous operation to click the
Directory link.
XPATH
If you run this code, it will not pull up the directory page. This is
because if you examine the HTML, either with the Page Inspector or
explicitly, you will see every option in the RESOURCES
list has an identical class of go282567778. So, if we try
to identify the Directory entry by its class, we will get
the first entry in the list instead, Academic and Student
Affairs.
To solve this, we need to look for a span entry that
contains the text Directory. This can be done using an
XPATH search. What an XPATH?
An XPATH is short for XML path, the path used to navigate
through the structure of an HTML document. By.XPATH
allows you to locate elements using XML path
expressions. XPATHs come in two flavours: absolute
and relative. An absolute XPATH defines the exact
path from the beginning of the HTML page to the page element you want
to locate.
This absolute XPATH says start at the root node (/), then
find the HTML element (which is the entire HTML for the
page), then the body element, the second div
in the body, the first div inside the body's
second div, and finally the first h4 section
heading within that div. Although this allows very
explicit selection, it is also labourious, and if the format of the
web page changes, the absolute XPATH will break. The much more common
alternative is a relative XPATH, which allows searching within the web
page for target elements. The basic format of a relative XPATH is:
where:
//: select the current node
tagname: tag name of the target node to be
found (div, img, a, and so on)
@: select an attribute
attribute: attribute name of the target node
to be found
value: attribute value of the target node to
be found
Alternatively, @attribute can be replaced by a
function call that the specific tagname understands. We
could use this to ask a span element to return its text
with text(), then search for a span with the
text Directory.
Given this, we could change our code to find the Directory
link using an XPATH, then click it.
Unfortunately, identifying the Directory link is only one
problem that we may encounter. You might assume, "If a link is always
available, we can just locate it and click it." This may not be true,
because exposing the panel containing Directory is also
making the link available. Trying to click the link
programmatically before we reveal the panel tells us the element is
not yet available for interaction
(an ElementNotInteractableException error). But, our code
above first clicked the magnifying glass link to make the panel
visible, then found and clicked the Directory link. Even
doing this, we may still encounter an interaction error. Why would
this happen?
When the web browser executes code for complicated web pages like the
NC State homepage, it takes time for the operations to complete and
the web page to update. Our code is running too quickly, so it asks
for a reference to the Directory link
before the webdriver has processed our first click and
rendered the drop-down panel. This is a very common occurrence during
web scraping of dynamic pages.
How can we solve this second error? An obvious way would be to create
an infinite loop that located the Directory link, and if
it wasn't available for interaction, slept for a short period of time,
then try again. This is strongly discouraged, however, since
it is inefficient, and it also blocks the Python interpreter from
performing any actions while the sleep command runs. Selenium provides
two possible methods for dealing with this issue: implicit
waits and explicit waits. An implicit wait will wait a
certain amount of time to locate an element before it gives up and
returns an error. An explicit wait will wait a certain amount of time
for a specific condition to evaluate to True based on the
web page's contents before it gives up and returns an error. It is
also fairly easy to write our own function to wait a set number of
attempts for a target element to become available on the web page
before giving up and deciding something has gone wrong.
In our situation, an implicit wait will not work, since
the Directory link is always present whether it is
visible (and clickable) or not. This means we will need an explicit
wait, with a specific condition we are waiting on.
Selenium's expected_conditions class provides numerous
ways to wait for specific conditions, including waiting until an
element is clickable. We will set an explicit wait for a span element
with text Directory for five seconds until it becomes
clickable.
Now, the second click registers as expected and we move to the Campus Directory web page, ready to search for information on campus members.
XPATH contains
As an alternative, we could also use contains to locate
an element based on a partial text match. Rather than
an XPATH of //tagname[ @attribute='value' ],
we can use //tagname[ contains(@attribute='partial-value'
] to locate an element of type tagname with
an attribute whose text
contains partial-value, for example:
This locates the span whose text
contains Dir (the start of the Directory
label). We could then elem.click() exactly as before to
reveal the Campus Directory web page.
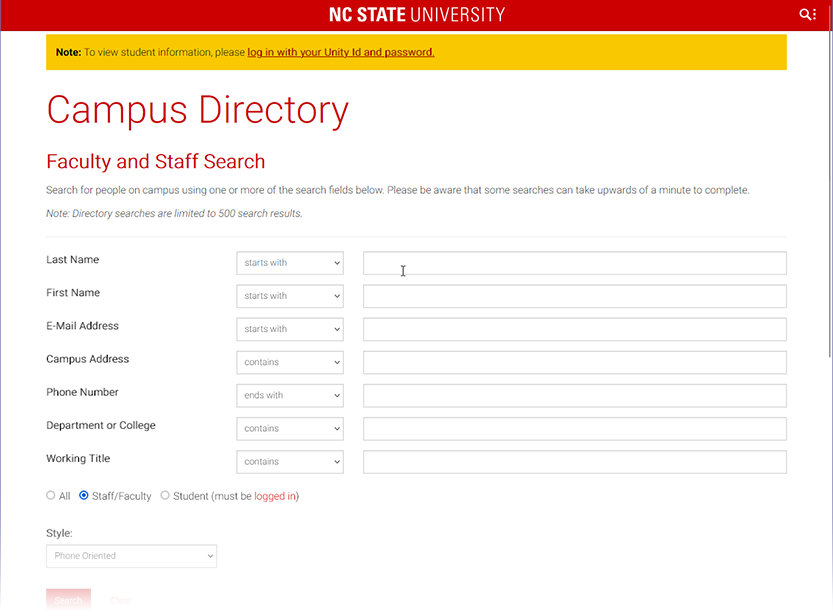
To finish our example, we will enter a last and first name into the
appropriate fields on the web form, then click the Search button to
retrieve information about the given individual. At this point, we
will have arrived at our target page, and we are ready to extract the
user's Email address from the resulting information. Fields are
populated using the send_keys, in the following way.
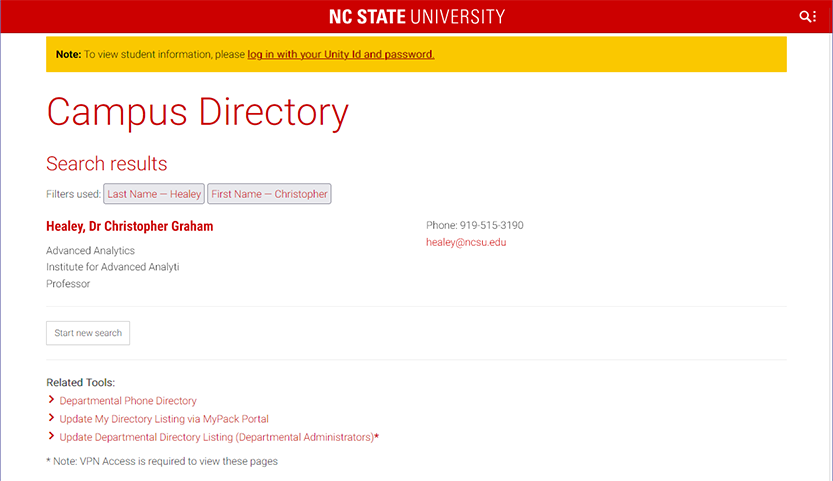
At this point, if we want to retrieve the value attached to Email field, we have two options. First, we can do this directly in Selenium. Second, we can ask Selenium to return the HTML for the current page, parse that HTML with Beautiful Soup, then retrieve the value attached to the Email field using Beautiful Soup's parse tree.
In both cases, the program returns healey@ncsu.edu, which
is the correct NC State email for employee Christopher Healey. You
might wonder, "This is a lot of work to get someone's email
address. Why would we go through all this effort for that result?" In
fact, we probably would not. However, suppose we had a list of 1,000
NC State employee first and last names, and we needed an email address
for each of them. Doing this manually through the NC State web page
would take a significant amount of time. With only a slight
modification to the end of our program, however, we could query an
email, go back one page, refill the fields to query a new email, and
so on until we had all 1,000 emails. Not only would it be fully
automated, it would also be much faster than a manual approach. This
is the power of Selenium and Beautiful Soup: the ability to automate
tedious or manually labourious tasks, even when they involve many
dynamic interactions with a web page.
As a practical example, we will use Beautiful Soup to scrape and print
the extended forecast for Raleigh reported by the National Weather
Service (NWS) web site. Since we have already discussed exploring a
web page to identify target elements, we will limit our example to
using Beautiful Soup to extract the elements we need. We also provide
the URL for Raleigh's weather forecast by entering Raleigh, NC into the
NWS homepage, producing a URL
of https://forecast.weather.gov/MapClick.php?lat=35.7855&lon=-78.6427.

To start, we scrape the HTML for Raleigh's web site and confirm it was returned properly.
The individual extended weather entries are contained in an unordered
list with an id of seven-day-forecast-list. Within each
list item is a div with a class
of tombstone-container. Within this div are four
separate paragraphs: (1) the period name (e.g., This Afternoon); (2)
an image whose alt tag contains the detailed forecast
(this is the same text as in the detailed forecast list, but it
appears as a tooltip when you hover over the image); (3) a short
description (e.g., Sunny); and (4) a temperature (e.g., High:
48°F). At this point, we have two options. We can combine together
the first, third, and fourth text items to produce a short summary
of the extended weather. Or, we can extract the alt text
of the img in the second paragraph. Below is code for
both options.
Here, we extract the HTML for each list item, convert it to a string,
and replace any line break <br/> with a
space. Then, we re-use BeautifulSoup to parse the HTML, and ask for
the text it contains. Joining these together produces a final set of
extended forecast summary lines.
If we instead wanted to use the alt text for the image
embedded in the second paragraph, the following code would extract
the alt text.
This produces a result similar to the first code block, although with slightly more detail and in a grammatically correct format.