Figure: Example map contents
For this project, you will be implementing a generic Map, like the Map class from the Java collections framework. A map lets you store a set of key / value pairs. The keys and values in our map can be either strings or integers. We'll be implementing the map as a hash table, so it should be able to efficiently handle a large number of keys.
Much of the work for this assignment will involve implementing the Map data structure and implementing the Text object we'll use to store strings in the map. We have a driver program (driver.c) for letting the user interact with a map by typing commands.
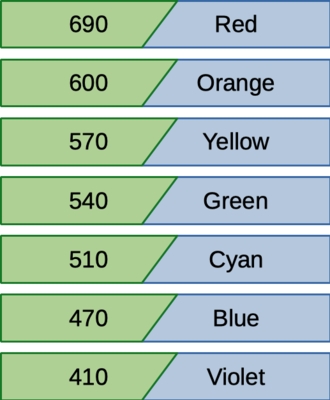
The following shows an execution of the driver program. Here, we're using integers (wavelengths of light) as keys and strings (color names) as the values. After the user enters commands to store several key / value pairs in the map, they query a few keys. These report the values entered for each key. For example, the "get 600" command reports the string "Orange", because "Orange" is the value given for the key, 600, earlier.
$ ./driver
cmd> set 690 "Red"
set 690 "Red"

cmd> set 600 "Orange"
set 600 "Orange"

cmd> set 570 "Yellow"
set 570 "Yellow"

cmd> set 540 "Gren"
set 540 "Gren"

cmd> set 510 "Cyan"
set 510 "Cyan"

cmd> set 470 "Blue"
set 470 "Blue"

cmd> set 310 "Violet"
set 310 "Violet"

cmd> get 600
get 600
"Orange"

cmd> get 540
get 540
"Gren"

cmd> set 540 "Green"
set 540 "Green"

cmd> get 540
get 540
"Green"

cmd> get 310
get 310
"Violet"

cmd> remove 310
remove 310

cmd> set 410 "Violet"
set 410 "Violet"

cmd> size
size
7

cmd> get 310
get 310
Undefined

cmd> get 410
get 410
"Violet"

cmd> quit
quit
The user can use the set command to change the value associated with a key or the remove command to remove a key / value pair from the map. The size command reports the number of keys currently stored in the map, and the quit command exits the program.
The following figure shows the contents of the map created with the above example, right before the user quits. It contains seven key / value pairs. The keys are shown on the left, and their corresponding values are shown on the right.
Figure: Example map contents
You will be developing this project in the p6 directory of your csc230 git repo, and, as usual, you'll submit by pushing your changes up to the NCSU github repo before the due date.
We're providing you with a starter that includes files to help you organize and test your program. See the Getting Started section for instructions on how to get the starter and unpack it into your repo.
This project supports a number of our course objectives. See the Learning Outcomes section for a list.
You get to complete this project individually. If you're unsure what's permitted, you can have a look at the academic integrity guidelines in the course syllabus.
In the design section, you'll see some instructions for how your implementation is expected to work. Be sure you to follow these guidelines as you're planning and implementing your solution.
The driver program doesn't take any command line arguments. It reads commands from standard input and writes all of its output to standard output.
Just like in project 4, the program will prompt the user with the following prompt. There's a space after the greater-than sign.
cmd> After the first command, print an extra blank line before each prompt. This will help to separate the output of one command from the next command.
After the user enters a line, the program will echo that line back to the user on the next output line. This should help with debugging since the output will show what command the user entered. Like it shows in the example at the start of the assignment, if the user is running the program interactively, they will see each of the commands they enter printed out right after they enter them.
All commands start with a word, either set, get, remove, size or quit. The get and remove commands take a key as a parameter, and the set command takes two parameters, a key and a value.
Each command is given on a single input line. The command name and its parameters can be separated by one or more whitespace characters (spaces, horizontal tab (\t), vertical tab (\v), form-feed (\r) or carriage return (\r)). There can also be extra whitespace at the start of the command or at the end.
The keys and values in the map can be either integers or strings. In the input, an integer can be entered in the same format accepted by the %d conversion specifier in scanf(). Likewise, integer values are printed in the format produced by the %d in printf().
Strings are entered as a sequence of zero or more characters surrounded by double quotes. For string output, the program will print the same sequence of characters, surrounded by double quotes. A string may contain spaces, but (unless you do the extra credit), a string can't contain newline characters or double quotes. A string can't span multiple input lines.
The following examples show the set command used with some string and integer values:
set 10 5
set "abc" 25
set 7 "purple"
set "a key" "a value"
For 5 points of extra credit, the program may permit escape sequences inside strings. Inside a string, the sequence \n represents a newline character. A \t represents a horizontal tab character. A \" represents a double quote inside the string, and a \\ represents a single backslash. If you do the extra credit, then your program should be able to handle input like:
cmd> set 20 "a \"string\""
set 20 "a \"string\""

cmd> set 30 "\\/"
set 30 "\\/"

cmd> set 40 "new\nline"
set 40 "new\nline"

cmd> get 20
get 20
"a "string""

cmd> get 30
get 30
"\/"

cmd> get 40
get 40
"new
line"
A set command starts with the word, set. This is followed by an integer or a string for the key, then an integer or string for the value associated with that key. If the given key wasn't previously in the map, this command will add it to the map (with the given value). If the given key was already in the map, this command will discard the previous value associated with it and store the given value instead.
Other than printing out a copy of the user's command, the set command doesn't produce any output.
The set command is invalid if it doesn't have exactly two parameters or if its parameters aren't in the right format for a string or an integer.
The following shows the program handling a few different examples of set commands, including some invalid examples at the end.
cmd> set 10 5
set 10 5

cmd> set "abc" 25
set "abc" 25

cmd> set 7 "purple"
set 7 "purple"

cmd> set "a key" "a value"
set "a key" "a value"

cmd> set
set
Invalid command

cmd> set xyz 25
set xyz 25
Invalid command

cmd> set "x" "y" "z"
set "x" "y" "z"
Invalid command
A get command starts with the word, get. This is followed by an integer or a string for a key. After echoing a copy of the user's command, the 'get' command prints the value associated with the given key. If the key isn't currently in the map, it prints out a line with the word: Undefined (no quotes).
The get command is invalid if it doesn't have exactly one parameter or if its parameter isn't in the right format for a string or an integer.
The following shows the program handling a few get commands, assuming the set examples from the previous section have already been done.
cmd> get "abc"
get "abc"
25

cmd> get 7
get 7
"purple"

cmd> get 25
get 25
Undefined

cmd> get 25 35
get 25 35
Invalid command
A remove command starts with the word, remove. This is followed by an integer or a string for a key.
It removes the key / value pair for the given key. If the given key wasn't in the map, then it prints a line, Not in map after echoing the user's command. If the given key is successfully removed, the program doesn't print anything after echoing the user's command.
The remove command is invalid if it doesn't have exactly one parameter or if its parameter isn't in the right format for a string or an integer.
cmd> remove 7
remove 7

cmd> remove "abc"
remove "abc"

cmd> remove "xyz"
remove "xyz"
Not in map

cmd> remove
remove
Invalid command
The size command should print out the number of keys currently in the map. It doesn't take any parameters. For example:
cmd> size
size
7

cmd> size "invalid" "example"
size "invalid" "example"
Invalid command
The quit command terminates the program. The program should also terminate if it reaches the end-of-file on standard input.
When the user enters the quit command, the program will echo it before terminating, just like it does with any other command. If the program reaches the end-of-file without a quit command, it will terminate without echoing anything after the last command prompt.
If the given command isn't valid, the program should print a line with the text, Invalid command, to standard output right after echoing the user's input. Then, it should ignore the command and prompt the user again.
cmd> blerg
blerg
Invalid command

cmd> set 700 "missing quote
set 700 "missing quote
Invalid command
You will implement your solution using six components. The starter includes a complete implementation for two of these and a partial implementation for two more.
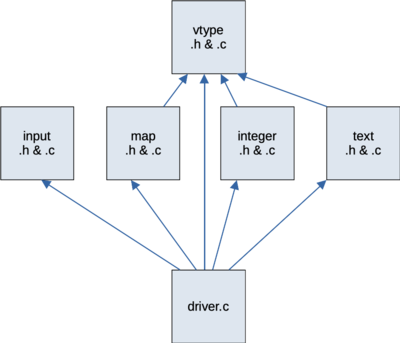
Figure: dependency among the program components
The input component is the same one you used in project 4. It will make it easy to read commands from the user a line at a time, decide if they are valid and discard the whole input line if they're not.
The vtype component defines the superclass used to represent strings and integers in the map. The integer component defines a subclass for storing integers and the text component defines a subclass for storing strings. The implementation file for the vtype component is mostly empty; it provides everything through its header. These components described in the VType Inheritance Hierarchy section below.
The map component provides an implementation of the map as a hash table. It is described in the Map Representation section below.
The driver component is the top-level, main component. Using the other components, it reads and processes commands from standard input, updates the map as needed and prints responses to user commands.
The dependencies among these components are shown in the figure above. The driver component can use functions and types defined in the other five. The map, integer and text components will need to use the vtype component, but they won't need to use each other directly.
To support both strings and integers as the keys and values in our map, we will use the same techniques object-oriented languages use internally. We went over some of these techniques in Lecture 21. We will define a struct named VType that works like a superclass. We will define two subclasses of VType, Integer for storing integer values and Text for storing string values.
The VType struct just contains four function pointers. These work like override-able methods for VType and its subclasses. They each take a pointer to a VType as their first parameter (maybe with additional parameters). This first parameter will be our implementation of the this pointer / reference in languages like Java. We'll use it to pass in a pointer to the instance of VType that the function is supposed to use.
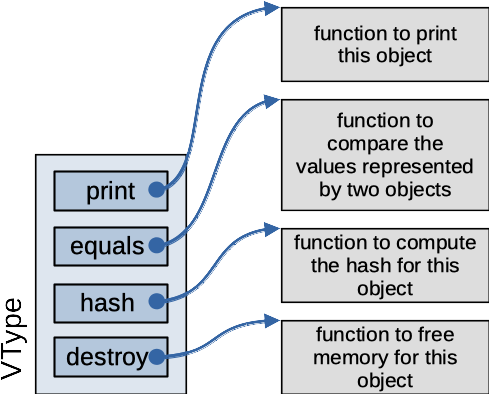
Figure: VType superclass representation
Every subclass of VType will need to define its own version of these four functions.
The print function will print out the value stored in that instance (in the format shown in the requirements). It won't automaticall print a newline at the end; client code can print a newline if it needs one.
The equals function will compare the two VType objects given as its parameters, returning true if they're equal. Two instances of VType are considered equal if they are both the same subclass and they contain the same value. For example, two integers would be equal if they both contained a value of 25, but an integer 25 would not be equal to a string, "25".
The hash function computes a hash value for the value contained in its VType instance. It's like the hash function on the Object class in Java. We will use this hash value to implement our map as a hash table; it will decide which linked list a key of this VType will go on.
The destroy function is responsible for freeing all the memory used to store the VType instance.
The Integer subclass of VType defines its own version of these four functions. It also adds a val field to hold the int value it stores.
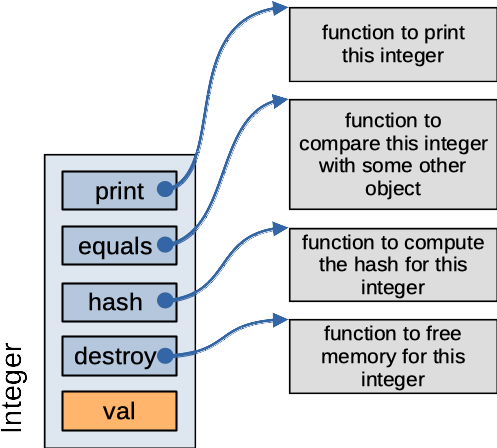
Figure: Integer subclass representation
You will be responsible for defining the Text subclass of VType. An instance of Text will contain an arbitrary string, and appropriate functions for printing, comparing, hashing and freeing itself.
For the hash function, your Text object will compute the Jenkins 32-bit hash function defined in the Wikipedia page: https://en.wikipedia.org/wiki/Jenkins_hash_function. In your implementation, you will use unsigned int as a 32-bit int used by the hash function. The starting and ending quotes given in the input are not part of the string, so they should not be included in the hash function calculation. Use the ASCII code as the value of each character in the string, and you should get the same hash results shown in the examples on the Wikipedia page. The unit test program for the text component includes checks for these two test cases, along with a few other Text values.
Your Text implementation will also need a parseText() function for creating a Text object based on user input. This function is described below, and the starter code includes a similar function for creating instances of Integer from user input.
The map of key / value pairs will be implemented as a hash table, with chaining to handle collisions. You will implement this in the map component. When the program starts up, it will create a hash table with a fixed number of entries (100). Each entry in the table will contain a pointer to the head of a linked list of Nodes, each node holding a key / value pair. The figure below shows a table with five entries (so, much smaller than the one we're using). Three of these hold pointers to empty lists. The first pointer points to a list of two key / value pairs and the second-to-last pointer points to a list of three key / value pairs.
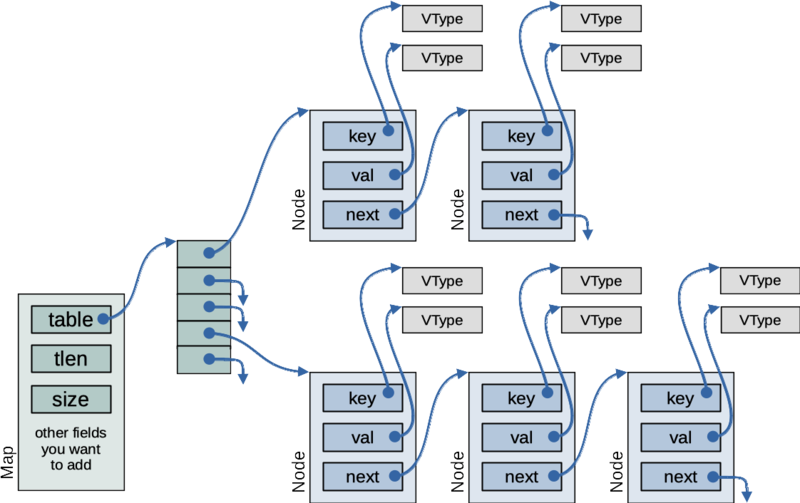
Figure: representation of the map as a hash table
When a key / value pair is added to the map (via the mapSet() function), the hash function will determine what list it is added to. This will help to make the data structure efficient. Hopefully, keys will be distributed among the lists in the table, so that no list gets very long.
Given a key, k, you will compute the table index to use for the key by computing the hash of k. Let's call this hash value h( k ). A node for key k will be stored in the list h( k ) % tlen, where % is the modulo operator and tlen is the number of elements in the table.
When you need to find a key in the map or remove one, you will do the same hash calculation to determine which list that key would be in. Then, (hopefully) you only need to look through a short linked list to find a Node with a matching key. The hash function determines which list a key will be stored on, and the equals function lets you compare two keys to determine if you've found a node with the key you're looking for.
As an example, the starter includes a unit test program for the map component. In this program, we create a map with a table size of 3 and insert the key / value pair, (5, 10). For the Integer value 5, the hash h( 5 ) = 5, so this key should stored in entry h( 5 ) % 3 = 2. Afterward, when the program looks for a key of 5, the map should hash this key to determine which list it must be in (again, entry 2 since h(5)). It can then look on just this one list for the key, rather than checking all three lists.
The starter includes a type definition for the Map struct and the Node used to hold each key / value pair. You can add fields to these structs if you need to. There's also a partial implementation of some functions for working with maps, but you will need to add more functions (described below) and complete the implementation of the provided functions.
Your hash table is not required to expand as more key / value pairs are added. It can maintain the same number of slots it had when it was created. This will make it less efficient, but it should be fast enough for the test cases we'll use in grading. For 8 points of extra credit, you can implement your map so it automatically grows the hash table as more keys are added. When the number of keys reaches the size of the table, you should double the number of table entries, remove the Nodes from the old table and reinsert them into the new, larger table. Growing the table automatically like this should help to keep all the linked lists short, even if a lot of different keys are added to the map.
If you do the extra credit, you don't ever need to shrink the table, even if keys are removed from the map. You only need to grow the table whenever the number of keys reaches the size of the table.
The input component can be the same as in project 4. It just needs a readLine() function that returns a dynamically allocated string containing the most recent line of input from stdin. This function should return NULL if the end-of-file is reached on standard input.
The map component should provide the following functions that may be used by the top-level component. You can add more functions if you'd like, but be sure to declare a function as static if it doesn't need to be used by other components.
Map *makeMap( int len )
This function makes an empty, dynamically allocated Map, initializing its fields and returning a pointer to it. The len parameter gives the initial size of the hash table used inside the map. If you do the extra credit, this table will grow as needed when new keys are added to the map. Otherwise, the table will remain at this size for the lifetime of the map.
int mapSize( Map *m )
This function returns the current number of key / value pairs in the given map.
void mapSet( Map *m, VType *key, VType *val )
This function adds the given key / value pair to the given map. If the key is already in the map, it replaces its value with the given value. The map will take ownership of the given key and value. It can use the key and val as part of its map representation if needed, and the map is responsible for eventually freeing these two objects when they are no longer needed.
VType *mapGet( Map *m, VType *key )
This function returns the value associated with the given key. If the key isn't in the map, it returns NULL. The returned VType is still considered part of the map representation and is still owned by the map. The caller should not free or modify this value. The map does not take ownership of the key parameter, and the caller is responsible for eventually freeing the key when it is no longer needed.
bool mapRemove( Map *m, VType *key )
This function removes the key / value pair for the given key from the map, freeing all the memory for that pair. It returns true if there was a matching key in the map and returns false otherwise. The map does not take ownership of the key parameter, and the caller is responsible for eventually freeing the key when it is no longer needed.
void freeMap( Map *m )
This function frees all the memory used to store the given map, including the memory for the hash table, all the Nodes and all the key / value pairs.
The integer component provides the following function for creating a new instance of Integer based on user input. This function is already provided in the starter.
VType *parseInteger( char const *init, int *n )init right after the section that defines the integer. Client code can use this like a %n conversion specifier for sscanf(). It can be used to parse additional input from the init string after the value used by the Integer.The text component will provide a similar function for creating Text objects:
VType *parseText( char const *init, int *n )n is non-null, it sets it to the location in init right after the section that was used to initialized the new Text object.Internally, the integer and text components need to define print, equals, hash and destroy functions for the subclass of VType they define. These functions will only need to be called via their function pointers in VType; they can be static and will not need to be exposed in the header. For documentation, you don't need to give a full Javadoc comment for these four functions. You can just say which method they perform for their object.
As in previous assignments, you get to create your own Makefile for this assignment. The default rule should build the driver target, using separate compile and link steps for building the executable. It should have a clean rule to delete the executable and any temporary files that could be easily re-created by rebuilding the program. The automated test script depends on your Makefile having a clean rule and a default target that builds the driver executable.
As in recent assignments, include the "-Wall" and "-std=c99" compile flags, along with "-g" to help with debugging.
The starter includes two unit test programs to help you check some of the functionality of individual components. There source file, textTest.c, is for testing the text component. It creates a few instances of the Text type and tries out a few functions for these objects. You should be able to build and run this test program as follows:
$ gcc -Wall -std=c99 -g textTest.c text.c vtype.c -o textTest
$ ./textTest
"abc"
"abc"
"xyz"
"ABCDEFGHIJKLMNOPQRSTUVWXYZ"
"a"
"The quick brown fox jumps over the lazy dog"
$ echo $?
0
The mapTest.c program is for testing the map component. It makes a map and tries out all the functions in the map component. You should be able to build and run this test using commands like the following.
$ gcc -Wall -std=c99 -g mapTest.c map.c integer.c vtype.c -o mapTest
$ ./mapTest
$ echo $?
0The starter includes a test script, along with several test input files and expected outputs. When we grade your program, we'll test it with the two unit test programs, with the automated test program, and maybe with a few other test cases that we're not providing. To run the automated test script, you should be able to enter the following:
$ chmod +x test.sh # probably just need to do this once
$ ./test.sh
As with previous test scripts, this one reports how it's running your program for each test. This should help you to see how to try out your program on any specific tests you're having trouble with, to figure out what's going wrong.
If your program is failing on a test case, you can try out just that one by hand. For example, you could run test 9 like the following:
$ ./driver < input-09.txt  > output.txt
$ echo $?
0
$ diff output.txt expected-09.txtYour program is expected not to exhibit memory errors, to free all of the dynamically allocated memory it allocates and close any files it opens. For this assignment, your program should never exit unsuccessfully, so it should always be able to clean up its memory before exiting.
Although it's not part of an automated test, we encourage you to try out your executable with valgrind. We certainly will when we're grading your work. Any leaked memory, use of uninitialized memory or access to memory outside the range of an allocated block will cost you some points. Valgrind can help you find these errors. It's probably good to test with valgrind as you develop. This could help you detect errors early, maybe before they cause problems on the larger test cases.
The compile instructions above include the -g flag when building your program. This will help valgrind give more useful reports of where it sees errors. To get valgrind to check for file leaks, memory errors, and memory leaks, you can run your program like this:
$ valgrind --leak-check=full --show-leak-kinds=all --track-fds=yes ./driver < input-08.txt
... lots of valgrind output deleted ...The starter includes a test script, test.sh, and several input and expected output files to help you make sure your program is behaving correctly. Here's a summary what each of the test cases tries to do:
This reports the size of the map (zero) then quits.
This test adds a key / value pair then reports the size of the map.
This test adds a key / value pair then uses the get command to check that key's value and the value of a different key that's not in the map.
This test adds two key / value pairs, then gets the value associated with each of them. Input ends at the end-of-file, rather than with a quit command.
This test changes the value for a key.
This test removes a key from the map.
This test uses Text objects as keys.
This test uses Text objects as keys. It also changes the values for some keys and removes a key.
This test uses integers as keys and text objects as values. It's the example shown at the start of the assignment.
This is a large, randomly-generated test case. It uses both strings and integers as the keys and values in the map.
This test contains some valid and some invalid commands.
This test contains some additional, invalid commands.
We'll be grading your project by making sure it builds cleanly, runs correctly on all our test cases (including some we're not giving out), follows the required design and adheres to the style guide.
You should have already cloned your assigned NCSU github repo when you were working on project 2. If you haven't done this yet, go back to the assignment for project 2 and follow the instructions for for cloning your repo.
You will need to copy and unpack the project 6 starter. We're providing this file as a compressed tar archive, starter6.tgz. You can get a copy of the starter by using the link in this document, or you can use the following curl command to download it from your shell prompt.
$ curl -O https://www.csc2.ncsu.edu/courses/csc230/proj/p6/starter6.tgzTemporarily, put your copy of the starter in the p6 directory of your cloned repo. Then, you should be able to unpack it with the following command:
$ tar xzvpf starter6.tgzOnce you start working on the project, be sure you don't accidentally commit the starter to your repo. After you've successfully unpacked it, you may want to delete the starter from your p6 directory, or move it out of your repo.
$ rm starter6.tgzIf you've set up your repository properly, pushing your changes to your assigned CSC230 repository should be all that's required for submission. When you're done, we're expecting your repo to contain the following files in the p6 directory. You can use the web interface on github.ncsu.edu to confirm that the right versions of all your files made it.
driver.c : the main source, completed by you.map.h / map.c : header and implementation file for the map component, provided with the starter and completed by you.text.h / text.c : header and implementation file for the Text object, implemented by you.integer.h / integer.c : header and implementation file for the Integer object, provided with the starter.vtype.h / vtype.c : header and implementation file for the vtype component, provided with the starter.input.h / input.c : header and implementation file for the input component, implemented by you.Makefile : Makefile for the project, written by you.input-*.txt : Input files for testing, provided with the starter.expected-*.txt : expected test output files, provided with the starter.test.sh : automated testing script, provided with the starter..gitignore : .gitignore file for this project, provided with the starter.It's OK if your repo also contains the source code for the two unit test programs, and maybe some other test programs that you created. It's normal to keep this kind of code in your repo, along with your implementation.
To submit your project, you'll need to commit your changes to your cloned repo, then push them to the NCSU github. Project 2 has more detailed instructions for doing this, but I've also summarized them here.
Whenever you create a new file that needs to go into your repo, you need to stage it for the next commit using the add command. You should only need to add each file once. Afterward, you can get git to automatically commit changes to that file:
$ git add some-new-fileThen, before you commit, it's a good idea to check to make sure your index has the right files staged:
$ git statusOnce you've added any new files, you can use a command like the following to commit them, along with any changes to files that were already being tracked:
$ git commit -am "<meaningful message for future self>"Remember, you haven't really submitted anything until you push your changes up to the NCSU github:
$ unset SSH_ASKPASS # if needed
$ git push
Checking jenkins feedback is similar to the previous projects. Visit our Jenkins system at http://go.ncsu.edu/jenkins-csc230 and you'll see a new build job for project 6. This job polls your repo periodically for changes and rebuilds and tests your project automatically whenever it sees a change.
The syllabus lists a number of learning outcomes for this course. This assignment is intended to support several of theses:
Write small to medium C programs having several separately-compiled modules.
Explain what happens during preprocessing, lexical analysis, parsing, code generation, code optimization, linking, and execution. Explain the function and organization of relevant, intermediate formats, including pre-processor expanded source code, object files and executables. Compare and contrast the build and execute behavior between C and Java.
Identify errors that can occur during various compilation phases, identify relevant error messages and warnings, and appropriately correct these errors.
Correctly identify error messages and warnings from the preprocessor, compiler, and linker, and avoid them.
Find and eliminate runtime errors using a combination of logic, language understanding, trace printout, and gdb or a similar command-line debugger.
Interpret and explain data types, conversions between data types, and the possibility of overflow and underflow.
Explain, inspect, and implement programs using structures such as enumerated types, unions, and constants and arithmetic, logical, relational, assignment, and bitwise operators.
Trace and reason about variables and their scope in a single function, across multiple functions, and across multiple modules.
Allocate and deallocate memory in C programs while avoiding memory leaks and dangling pointers. In particular, they will be able to implement dynamic arrays and singly-linked lists using allocated memory.
Use the C preprocessor to control tracing of programs, compilation for different systems, and write simple macros.
Write, debug, and modify programs using library utilities, including, but not limited to assert, the math library, the string library, random number generation, variable number of parameters, standard I/O, and file I/O.
Use simple command-line tools to design, document, debug, and maintain their programs.
Use an automatic packaging tool, such as make or ant, to distribute and maintain software that has multiple compilation units.
Use a version control tool, such as subversion (svn) or Git, to track changes and do parallel development of software.
Distinguish key elements of the syntax (what's legal), semantics (what does it do), and pragmatics (how is it used) of a programming language.
Describe and demonstrate how to avoid the implications of common programming errors that lead to security vulnerabilities, such as buffer overflows and injection attacks.