Figure: example execution of encode and decode
For this project, you will write a pair of programs that work together to encode and decode arbitrary binary files using a text format called base64. This is a common way of encoding binary files so they can be stored or transmitted via a medium that might have originally been designed for only plain text data. It has a Wikipedia page that can tell you more about the format and its variants: Base 64 Encoding. There's also a standard system utility program named base64 that does the same kind of encoding we're doing in this project.
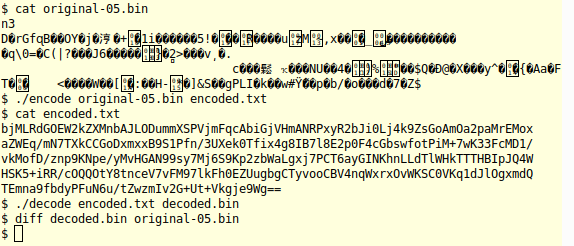
We'll be writing two programs. The following example shows what they can do. When we try to look at the binary file, "original-05.bin", in the terminal, it looks like garbage. If we encode it with our encode program, it converts the binary data to a (slightly longer) file containing just printable ASCII characters. This file looks OK when we view it out in the terminal. It's something we could copy into an email or show on a web page.
Figure: example execution of encode and decode
Given the encoded file, we can convert it back to the original using the decode program. In the terminal output above, you can see that the decoded file is identical to the original. You'll be writing your own encode and decode programs to convert arbitrary binary files to plain text and back to binary.
As with recent assignments, you'll be developing this project using git for revision control. You should be able to just unpack the starter into the p5 directory of your cloned repo to get started. See the Getting Started section for instructions.
This Project supports a number of our course objectives. See the Learning Outcomes section for a list.
You get to complete this project individually. If you're unsure what's permitted, you can have a look at the academic integrity guidelines in the course syllabus.
In the design section, you'll see some instructions for how your implementation is expected to work. Be sure you follow these rules. It's not enough to just turn in a working program; your program has to follow the design constraints we've asked you to follow. For this project, we're putting some constraints on the components you will use and the functions they must provide. Still, you will have lots of opportunities to design parts of the project for yourself.
This section says what your programs are supposed to be able to do, and what they should do when something goes wrong.
The encode program and the decode program both expect two required command-line arguments, an input file and an output file. Running encode, as follows will get it to read input from the binary file input.bin and write output to a text file named output.txt. The input file could consist of any sequence of bytes, but the output file will consist only of printable ASCII characters.
./encode input.bin output.txtThe encode program also takes two optional command-line arguments, -b and -p. These are described below. These options can be given any number of times on the command line, but listing either of them more than once has no additional effect. If the user runs encode with invalid arguments, it will print a line giving the following usage message to standard error, then terminate with an exit status of 1.
usage: encode [-b] [-p] <input-file> <output-file>Running the decode program as follows will get it to read base64-encoded text input from a file named input.txt, decode it and write the result to the binary output file, output.bin.
./decode input.txt output.binThe decode program does not accept any additional command-line arguments. If it's run with invalid arguments (e.g., with extra arguments or missing an argument), it will print a line to standard error giving the following usage message, then terminate with an exit status of 1.
usage: decode <input-file> <output-file>If either program can't open one of the given files, it should print the following error message to stderr, where filename is the name of the file as given on the command line. You should use perror() to generate this error message, so the particular message you get may depend on the system your program is running on, or the particular error that occurs when you try to open the file.
filename: No such file or directoryFor both programs, you should try to open the given input file before opening the output file. So, if both of the filenames would cause an error, the program should just report the error for the input file (the first one it tries to open). If either program is given an invalid input file, it should not open or create the ouptut file. That way, the program won't accidentally destroy the output file if you make a mistake in the input file you ask it to use.
In base64 encoding, we encode the contents of a file using a set of 64 printable characters. We'll call these the encoding characters. Each encoding character represents six bits from the input. The following table shows the 64 encoding characters we will use, along with the 6-bit pattern represented by each character. The upper-case letters, lower-case letters and decimal digits give us 62 different printable characters, almost everything we need. Along with these, we will use + and / to get 64 different characters. That's enough to have an encoding character for each possible 6-bit pattern.
| 6-bit pattern | Symbol |
|---|---|
| 000000 | A |
| 000001 | B |
| 000010 | C |
| 000011 | D |
| 000100 | E |
| 000101 | F |
| 000110 | G |
| 000111 | H |
| 001000 | I |
| 001001 | J |
| 001010 | K |
| 001011 | L |
| 001100 | M |
| 001101 | N |
| 001110 | O |
| 001111 | P |
| 010000 | Q |
| 010001 | R |
| 010010 | S |
| 010011 | T |
| 010100 | U |
| 010101 | V |
| 010110 | W |
| 010111 | X |
| 011000 | Y |
| 011001 | Z |
| 011010 | a |
| 011011 | b |
| 011100 | c |
| 011101 | d |
| 011110 | e |
| 011111 | f |
| 100000 | g |
| 100001 | h |
| 100010 | i |
| 100011 | j |
| 100100 | k |
| 100101 | l |
| 100110 | m |
| 100111 | n |
| 101000 | o |
| 101001 | p |
| 101010 | q |
| 101011 | r |
| 101100 | s |
| 101101 | t |
| 101110 | u |
| 101111 | v |
| 110000 | w |
| 110001 | x |
| 110010 | y |
| 110011 | z |
| 110100 | 0 |
| 110101 | 1 |
| 110110 | 2 |
| 110111 | 3 |
| 111000 | 4 |
| 111001 | 5 |
| 111010 | 6 |
| 111011 | 7 |
| 111100 | 8 |
| 111101 | 9 |
| 111110 | + |
| 111111 | / |
Consider the following illustration of a binary file. It's the same as test input, original-02.bin. Each row in the figure shows a byte from the file, with the most-significant bit on the left and the least significant on the right.
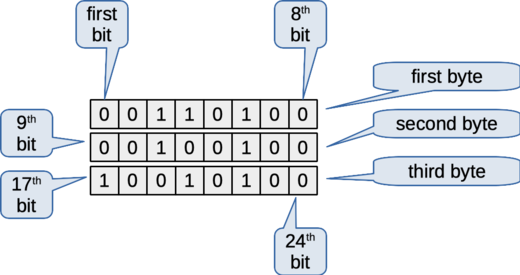
Figure: Bits in a small binary file
In base64 encoding, the first character in the encoding represents the first six bits of the file, starting from the most-significant bit of the first byte. The first six bits are "001101". This is represented by character 'N', according to the table above.
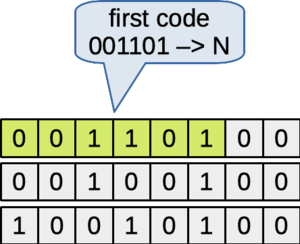
Figure: The six high-order bits determine the first encoding character
The next six bits from the file are the two remaining bits from the first byte and the four high-order bits from the next byte. Together, these are "000010", which is represented by the character 'C'.
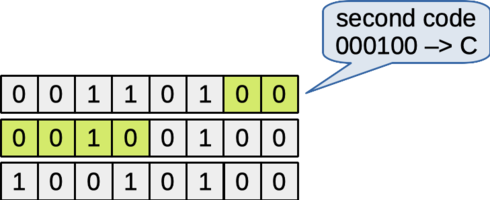
Figure: The next six bits determine the second encoding character
The next six bits from the file are the remaining four from the second byte and the two high-order bits from the third byte. These are "010010", represented by the character 'S'.
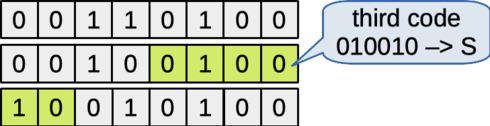
Figure: The next six bits determine the third encoding character
The next six bits from the file are the six low-order bits from the third byte. These bits are "010100", so they are represented by the character 'U'.
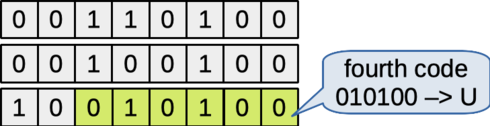
Figure: The next six bits determine the fourth encoding character
If the file was longer than 3 bytes, each successive group of three bytes would be converted to characters in the same way. If the file length isn't a multiple of three, then the end of the encoding will include some padding.
During encoding, if the length of the input file isn't a multiple of three, there may be one or two left-over bytes at the end. We will handle these as special cases.
If there is just one byte remaining after the last group of three, we will encode it with two encoding characters, followed by two equals signs. Notice that the equals sign doesn't show up in the table of encoding characters above. It's just used for padding at the end. The first encoding character will be determined by the high-order six bits of the last byte. The next encoding character will be determined by the remaining two bits of the last byte, along with four zero bits to fill in the remaining four bits. These added zero bits are shown in green in the figure below.

Figure: Example with one additional byte after the last group of three
If there are two bytes remaining after the last group of three, we will encode them as three encoding characters, followed by just one equals sign. The first encoding character will be determined by the high-order six bits of the second-to-last byte. The next encoding character will be determined by the remaining two bits of this byte, along with the high-order four bits of the last byte. The third encoding character will be based on the remaining four bits of the last byte, with two extra zero bits to fill in the two low-order bits (shown in green).
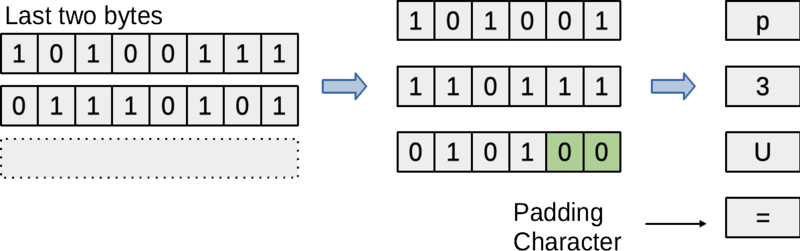
Figure: Example with two additional bytes after the last group of three
The equals signs at the end are optional. By default, the encode program will fill in the last group of four characters with equals signs when necessary. However, the -p option disables this; it turns off padding. If encode is run with the -p option, then the encoded output will not add these extra equal signs at the end. It may still need to fill in extra zero bits to complete the last 6-bit code, but it won't add equals signs after this last encoding character.
The decode program should ignore any number of equals signs at the end of the input file, provided there are no encoding characters after an equals sign. If there is an encoding character after an equals sign, then the input file is considered invalid (see below).
For both encode and decode, if the input file is empty, then the program should write out an empty output file. No padding is required if the input file is empty.
By default, the encode program will limit output line length to 76 characters. It will add newline characters after the 76-character limit is reached, then start putting subsequent output characters on the next line. The last line of output should end with a newline character, even if it's shorter than 76 characters.
Giving the -b option on the command line (no line breaks) will prevent encode from breaking lines at the 76-character limit. All the encoded output will be output on one line, with just one newline character at the end.
The decode program will ignore any amount of whitespace anywhere in the input file. Here, whitespace includes any of the six characters recognized by the isspace() standard library function.
The encode program should work for any input file. It should be able to handle any sequence of bytes of any length.
Input for the decode program could be invalid. If the input file contains non-whitespace characters that are not valid encoding characters and not an equals sign, then the input is invalid. Also, if there are encoding characters after an equals sign, then the file is invalid. Given an invalid input file, the decode program should print a line with the following message to standard error and then terminate with an exit status of 1:
Invalid input fileIf the input file is invalid, the decode program should not open or create the ouptut file. That way, the decode program won't accidentally destroy the output file if you make a mistake in the input file you ask it to use.
Your implementation will be split into four components. The following figure shows how they're organized. The encode.c and decode.c components are the top-level components for each of our programs. They will contain the main() function and any other functions you need to add to help simplify each program.
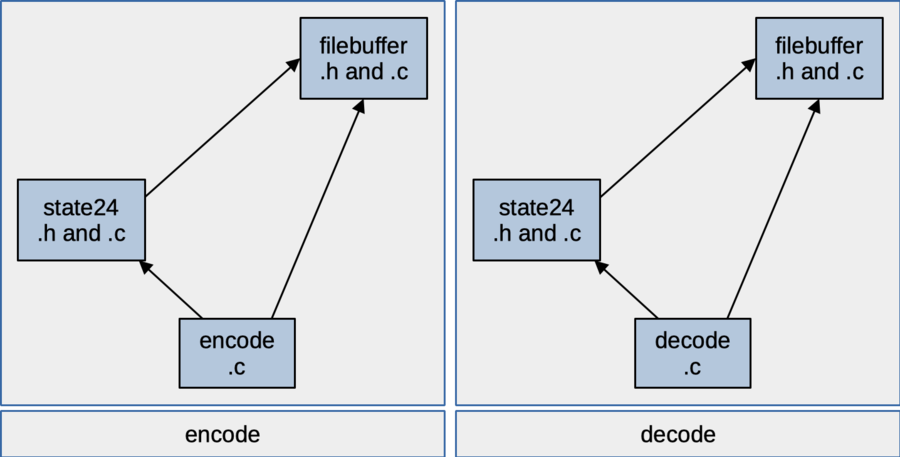
Figure: components and dependency structure
The filebuffer component provides a struct and related functions to help read and write binary files. The state24 component contains a struct and related functions for converting between bytes and the characters used in base64 encoding. The state24 component can use features from filebuffer, but it probably just needs the type definition for the byte type given in the filebuffer header.
The encode program is made by compiling and linking together filebuffer.c, state24.c and encode.c. The decode program uses filebuffer.c, state24.c and decode.c.
The starter code includes a type definition in filebuffer.h to let us call unsigned char by the name, byte. We'll use this when we're working with byte values, rather than character codes (plus, it's a little shorter than having to say "unsigned char"). The filebuffer component and the state24 component also typedef two structures to type names, FileBuffer and State24. You get to add fields to the FileBuffer struct if you need to (you probably will) and you get to define everything in the State24 struct.
The encode program is expected to be able to read arbitrary, binary files as input, and decode is expected to be able to write arbitrary binary files as output. For these, you will need to open files in binary mode and use appropriate I/O functions for working with binary data. You shouldn't assume the these files consist only of text. They may even contain bytes with a value of zero, so you wouldn't want to try to use the contents of a binary file as if it was a string. Any bytes with a value of zero would look like null terminators for a string.
The filebuffer component will provide a struct (typedeffed to FileBuffer) that contains a resizable array of bytes representing the contents of a file. The starter just has one field in this struct, a pointer to a dynamically allocated array of bytes representing a file's contents. You are expected to add more fields to this struct to complete the implementation.

Figure: FileBuffer struct definition
The FileBuffer will make it easy to access the input and build the output file. It will let you read the whole input file to memory before you start looking at it. It will also make it easy to create the whole output file in memory, then write it all out to a file when you're ready.
For your FileBuffer, you are expected to implement some functions described below. It's also OK if other components directly access the fields of your FileBuffer, without going through one of your functions.
The filebuffer component will provide the following functions. You can add more if they're useful in your implementation. Just be sure to mark a function as static if it's only needed in the current implementation file.
FileBuffer *makeFileBuffer()
This function dynamically allocates a FileBuffer, initializes so it contains an empty sequence of bytes and returns a pointer to the new FileBuffer.
void freeFileBuffer( FileBuffer *buffer )
This function frees all the memory used to represent the given FileBuffer.
void appendFileBuffer( FileBuffer *buffer, byte val )
This function adds a byte with the given value to the end of the byte sequence stored inside the given FileBuffer. It grows the internal data array in FileBuffer if necessary to add the given byte to the end.
FileBuffer *loadFileBuffer( char const *filename )
This function reads a binary input file, stores its contents it in the resizable array inside a new FileBuffer and returns it to the caller. After using this function to read a file, client code can access the file's contents via the FileBuffer's data array.
void saveFileBuffer( FileBuffer *buffer, char const *filename )
This function saves the contents of the given FileBuffer to a (binary) file with the given name.
The stater for this project includes a unit test program for the filebuffer component. It tries to test all the functions provided by the component using just the data field that's included with the starter. You'll probably add a fields to this struct yourself, so you may want to add some test code to make sure your fields are behaving the way you expect.
You can build and run this test with commands like the following.
$ gcc -Wall -std=c99 -g filebuffer.c filebuffertest.c -o filebuffertest
$ ./filebuffertestThe state24 component stores the current state of the encoding or decoding, represented up to 24 bits. Its job is to make it easy to convert between bytes and encoding characters for up to 24 bits at a time.
The state24 component should provide at least the following functions. You can add more if they're useful in your implementation. Just be sure to mark a function as static if it's only needed in the current implementation file.
void initState( State24 *state )
Given a pointer to a State24 struct, this function will initialize it to an empty state, where no bits have been added yet. Notice that the caller is expected to allocate the struct and just pass a pointer to this function. The initState() function fills in the fields of the given struct; it's not responsible for allocating it.
bool validChar( char ch )
This function returns true if the parameter is one of the 64 encoding characters given in the table in the requirements seciton. Client code can use this to check whether a character is valid before calling addChar().
void addByte( State24 *state, byte b )void addChar( State24 *state, char ch )
This function adds 6 bits to the state, given an encoding character. For example, if ch is 'a', then this function will add the bits "011010"; that's the bit sequence represented by character 'a'. Behavior is undefined if the given character isn't an encoding character or if there isn't enough room for six more bits.
int getBytes( State24 *state, byte buffer[] )
This function fills in the given array with up to three bytes based on the sequence of bits in the given State24 struct. It returns the number of bytes written to the array and sets the given state to empty (so you don't have to call initState() again before you start adding more bits to the state).
int getChars( State24 *state, char buffer[] )
This function fills in the given array with character codes for up to four encoding characters based on the sequence of bits in the given State24 struct. It returns the number of characters written to the array and sets the given state to empty. This function is not required to put null termination on the end of the buffer[], but you can implement it that way if you want to be able to use the resulting buffer array like a string. Keep in mind, if you plan to add null termination, the caller will need to provide a 5-character array.
After you initialize it, a State24 struct is empty. It has room for 24 bits, but none of them have been specified yet.

Figure: State24 object initially empty
You can call addByte() to fill in 8 bits in the struct, based on the value of a given byte. Here, we're adding a byte with a value of 0x34.

Figure: State24 object with one byte (8 bits) added
Adding another byte (with a value of 0x24 in the figure) fills in the next 8 bits in the state.

Figure: State24 object with two bytes (16 bits) added
Adding one more byte (with a value of 0x94 in the figure) fills in the last 8 bytes in the state.

Figure: State24 object with three bytes (24 bits) added
After filling in all the bytes, the getChars() function will copy character codes for these 24 bits to a given char array, Each character represents 6 bits from the buffer, according to the table of encoding characters given in the requirements section. In the figure below, for example, the first six bits are 001101, so the getChars() function fills in 'N' as the first element of the array. That's the character used to represent the bit pattern, 001101.
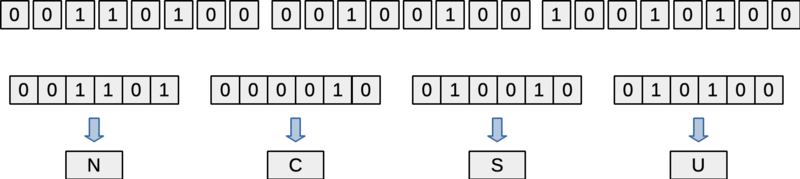
Figure: State24 object 24 bits removed as 4 characters
The addByte() and getChars() functions are for encoding binary files as a sequence of encoding characters. The addChar() and getBytes() are for decoding, converting sequences of up to four encoding characters to arrays of up to three bytes.
The getChars() and getBytes() functions return the number of characters or bytes that they fill in in the destination buffer. If the state contains 24 bits, then getChars() will return a value of 4 and getBytes() will return 3. However, near the end of the input file, there may not be enough input to fill in all 24 bits in the state. In this case, these functions will return less.
The getBytes() and getChars() functions will behave slightly differently when the state contains fewer than 24 bits. The getChars() function will fill in a number of characters determined by rounding up to the nearest multiple of 6 bits. Extra bits will be filled in with zeros as needed. So, for example, if the State24 struct contains 8 bits, then calling getChars() will return two. The first character will be determined by the first six bits in the state. The remaining two bits, along with four more zero bits (shown in green in the figure below) will determine the next character.
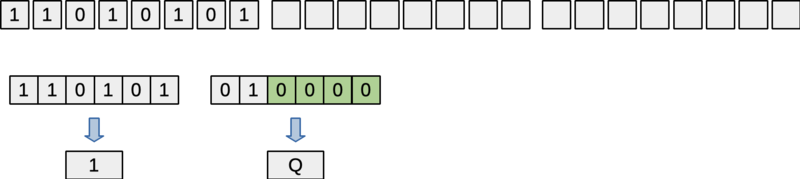
Figure: Padding with zeros if the number of bits isn't a multiple of 6
If the State24 struct doesn't contain 24 bits, the getBytes() function will fill in a number of bytes determined by rounding down to the nearest multiple of 8 bits. Extra bits past the last multiple of 8 will be ignored. So, for example, if there are 12 bits in the State24 struct, then calling getBytes() will return one. It will fill in one byte based on the first 8 bits in the state. The remaining 4 bits in the state will be ignored.
In your state24 component, you can use a few static global variables to help with the conversion between binary codes and characters, if you want. As static globals, they are a hidden implementation detail for the state24 component, and should be invisible to other components. Also, your State24 implementation isn't expected to be able to mix addtion of bytes and chars. For example, you're not expected to be able to handle a call to addByte() followed immediately by a call to addChar().
The stater for this project includes a unit test program for the state24 component. It tests all the functions provided by the component with some simple test inputs, using assert() to catch where any tests fail. The source code is commented to explain what the test is doing.
You can build and run this test with commands like the following.
$ gcc -Wall -std=c99 -g state24.c state24test.c -o state24test
$ ./state24testYou get to implement your own Makefile for this project (called Makefile with a capital 'M', no filename extension). Its default target should build both your encode and decode programs, compiling each source file to an object file and then linking the objects together into an executable.
In project 2, we talked about how to have the default target build two different executables. You should use the same technique here. When the user enters make, it should build both the encode and decode programs.
As usual, your Makefile should correctly describe the project's dependencies, so targets can be rebuilt selectively, based on what parts of the project have changed. It should compile source files with our usual command-line options, including -g for help with debugging. It should also have a clean rule, to let the user discard temporary files and other files that make can rebuild.
The starter includes a test script, along with test input files and expected outputs. When we grade your program, we'll test it with this script, along with a few other test inputs we're not giving you. We will also use the test driver programs for the state24 and filebuffer components, possibly with some additional unit tests.
To run the automated test script, you should be able to enter the following:
$ chmod +x test.sh # probably just need to do this once
$ ./test.sh
This will automatically build your program using your Makefile and see how it behaves on all the provided test cases. The test script does not automatically run the unit test programs. You'll need to run these separately.
As you develop and debug your programs, you'll want to be able to run them yourself, to see what they're doing and maybe try them out inside the debugger. As you run the test script, you'll see it reports on how it's running your program for each test. You can copy this command to run your program directly to get a better idea of how it's behaving. Notice that the test script redirects the standard output and standard error streams to files. When you're running tests yourself, you may want to let this output go to the terminal instead, especially if you're trying to see valgrind output.
To help you take a look at the input and output files in binary, we're providing source code for a simple program that prints out the individual bits of any file. This may help you to see if the bit sequences you're trying to write to a file are really making it there. It's called dumpbits.c. You can compile it like any C program, then redirect standard input from a file to get it to print out the contents of any file in binary. For example, if you run it as follows, it will show the contents of the binary input file for test 4. On the left, it's showing the index of each byte in hexadecimal. On the right it's showing the bits in that byte, high-order bit first.
$ ./dumpbits < original-04.bin
0000 01100111
0001 11000110
0002 01101001
0003 01110011
0004 01010001
0005 11111111
0006 01001010
0007 11101100When it terminates successfully, your program is expected to free all of the dynamically allocated memory it allocates and close any files it opens. When your programs need to exit unsuccessfully, they are not expected to free all resources (since, on an error, you could be exiting from somewhere other than main and may not have access to all resources).
To get valgrind to check for memory errors, memory leaks and file leaks in one of your programs, you can run your program like the following. The valgrind output goes to standard error, so don't send your error output to a file if you want to see what valgrind has to say. Also remember that valgrind will be able to give you a more useful report if you compile with the -g flag.
$ valgrind --leak-check=full --show-leak-kinds=all --track-fds=yes ./encode original-05.bin output.txt
.. lots of valgrind output ..
Near the end of the valgrind output, you'll get a report that file descriptors 0, 1 and 2 are still open. That's normal; those are standard input, standard output and standard error. If you see others, that's probably a file leak.
Most of the test cases involve encoding a binary input file and then decoding the base64 result to obtain the original.
This is a test case for encode and decode. The original (binary) file is a 3-byte file consisting of zeros, so it encodes to a file containing "AAAA".
This is a test case for encode and decode. The original (binary) file is a 3 bytes long, and it encodes to the four characters, "NCSU".
This is a test case for encode and decode. The original (binary) input file is 12-bytes long, containing lots of bytes that aren't printable ASCII characters.
This is a test case for encode and decode. The original (binary) file is 8 bytes long, so the output will be padded with a "=" character.
This is a test case for encode and decode. The original (binary) input file is 256 bytes long. It contains a copy of every possible byte value, in a random order.
This is a test case for encode and decode. The encoded (base64) file contains four copies of every valid character used in the base64 encoding, in a random order.
This is a test case for encode and decode. The original (binary) input file is an image in png format, although its file name extension has been changed to .bin.
This is a test case for encode and decode. We're using command-line options to disable line breaks and tabbing int he encoded file.
This is an error test for the encode program. We run it with invalid command-line arguments (-break instead of -b)
This is an error test for the decode program. The encoded input file contains an invalid character (a period).
The grade for your programs will depend mostly on how well they function. We'll also expect them to compile cleanly, to follow the style guide and to follow the design given for each program. We'll also try your programs under valgrind, to see if it finds any memory errors or leaks.
To get started on this project, you'll need to clone your NCSU github repo and unpack the given starter into the p5 directory of your repo. You'll submit by committing files into your repo and pushing the changes back up to the NCSU github.
You should have already cloned your assigned NCSU github repo when you were working on Project 2. If you haven't already done this, go back to the assignment for Project 2 and follow the instructions for cloning your repo.
You will need to copy and unpack the project 5 starter. We're providing this file as a compressed tar archive, starter5.tgz. You can get a copy of the starter by using the link in this document, or you can use the following curl command to download it from your shell prompt.
$ curl -O https://www.csc2.ncsu.edu/courses/csc230/proj/p5/starter5.tgzTemporarily, put your copy of the starter in the p5 directory of your cloned repo. Then, you should be able to unpack it with the following command:
$ tar xzvpf starter5.tgzOnce you start working on the project, be sure you don't accidentally commit the starter to your repo. After you've successfully unpacked it, you may want to delete the starter from your p5 directory, or move it somewhere else in the file system. That will help make sure you don't accidentally commit the starter to your repo.
$ rm starter5.tgzIf you've set up your repository properly, pushing your changes to your assigned CSC230 repository should be all that's required for submission. When you're done, we're expecting your repo to contain the following files under the p5 directory in your main branch. You can use the web interface on github.ncsu.edu to confirm that the right versions of all your files made it.
encode.c : main implementation file for encode, created by you.decode.c : main implementation file for decode, created by you.state24.h : header file for the state24 component, provided with the starter and completed by you.state24.c : implementation file for state24 component, created by you.filebuffer.h : header file for the filebuffer component, provided with the starter and completed by you.filebuffer.c : implementation file for the filebuffer component, created by you.Makefile : the project's Makefile, created by you.original-*.bin : test input files for encode, also expected output files for decode, provided with the starter.encoded-* : expected output files for encode, also test input files for decode, provided with the starter.expected-stderr-*.txt : expected error output for a few of the tests, provided with the starter.test.sh : test script, provided with the starter..gitignore : a file provided with the starter, to tell git not to track temporary files for this project.It's not required, but you may also have the utility program, dumpbits.c in your repo and the two test programs, state24test.c and filebuffertest.c.
To submit your project, you'll need to commit your changes to your cloned repo, then push them to the NCSU github. Project 2 has more detailed instructions for doing this, but I've also summarized them here.
The first time you add a new file to your repo, you'll need to stage it for the next commit. You can do this with the add command. After you add any given file, git will automatically track it. For subsequent commits, you won't need to add that file specifically; you can use the '-a' option to commit instead.
$ git add some-new-file-for-the-repoThen, before you commit, it's a good idea to check to make sure your index has the right files staged:
$ git statusOnce you've staged a set of related changes, commit them locally. The '-a' flag will tell git to automatically add any modifications to files added in a previous commit. The '-m' flag lets you give a commit message right on the command line, rather than starting up an editor for you.
$ git commit -am "<meaningful message for future self>"Of course, you haven't really submitted anything until you push your changes up to the NCSU github:
$ git pushChecking jenkins feedback is similar to the previous Project. Visit our Jenkins system at http://go.ncsu.edu/jenkins-csc230 and you'll see a new build job for Project 5. This job polls your repo periodically for changes and rebuilds and tests your project automatically whenever it sees a change.
The syllabus lists a number of learning outcomes for this course. This assignment is intended to support several of theses:
Write small to medium C programs having several separately-compiled modules.
Explain what happens during preprocessing, lexical analysis, parsing, code generation, code optimization, linking, and execution. Explain the function and organization of relevant, intermediate formats, including pre-processor expanded source code, object files and executables. Compare and contrast the build and execute behavior between C and Java.
Identify errors that can occur during various compilation phases, identify relevant error messages and warnings, and appropriately correct these errors.
Correctly identify error messages and warnings from the preprocessor, compiler, and linker, and avoid them.
Find and eliminate runtime errors using a combination of logic, language understanding, trace printout, and gdb or a similar command-line debugger.
Interpret and explain data types, conversions between data types, and the possibility of overflow and underflow.
Explain, inspect, and implement programs using structures such as enumerated types, unions, and constants and arithmetic, logical, relational, assignment, and bitwise operators.
Trace and reason about variables and their scope in a single function, across multiple functions, and across multiple modules.
Allocate and deallocate memory in C programs while avoiding memory leaks and dangling pointers. In particular, they will be able to implement dynamic arrays and singly-linked lists using allocated memory.
Use the C preprocessor to control tracing of programs, compilation for different systems, and write simple macros.
Write, debug, and modify programs using library utilities, including, but not limited to assert, the math library, the string library, random number generation, variable number of parameters, standard I/O, and file I/O.
Use simple command-line tools to design, document, debug, and maintain their programs.
Use an automatic packaging tool, such as make or ant, to distribute and maintain software that has multiple compilation units.
Use a version control tool, such as subversion (svn) or Git, to track changes and do parallel development of software.
Distinguish key elements of the syntax (what's legal), semantics (what does it do), and pragmatics (how is it used) of a programming language.
Describe and demonstrate how to avoid the implications of common programming errors that lead to security vulnerabilities, such as buffer overflows and injection attacks.